Apr 24, 2014

9th Valcellina Award - first part

9th Valcellina Award - first part


      This is the first of the two posts I am dedicating to the 9th Valcellina Award - international contemporary textile/fiber art competition. The most important textile/fiber art event in my home region and one among the most prestigious in Italy, the Valcellina award, opened 14th of april in Maniago (which is almost my “back yard”) at D’Attimis Palace. This year’s theme was “The Double” and the jury selected the works of 24 young artists to enter the exhibition.

      There were lots of things (especially regarding the organisational aspects) one could criticise or praise but I’m not going to. Criticising things from the cosiness of a little blog is not very constructive. Overall I think it’s a good thing and a beautiful exhibition. So if you happen to be near Maniago in the next two weeks (it closes 11th of may) you should see it.


      These are some pictures - mostly details - I took of the “non-winning” works I liked best.

      Wona Cho // South Korea-Finland // Fictitious#1 // fabric, thread


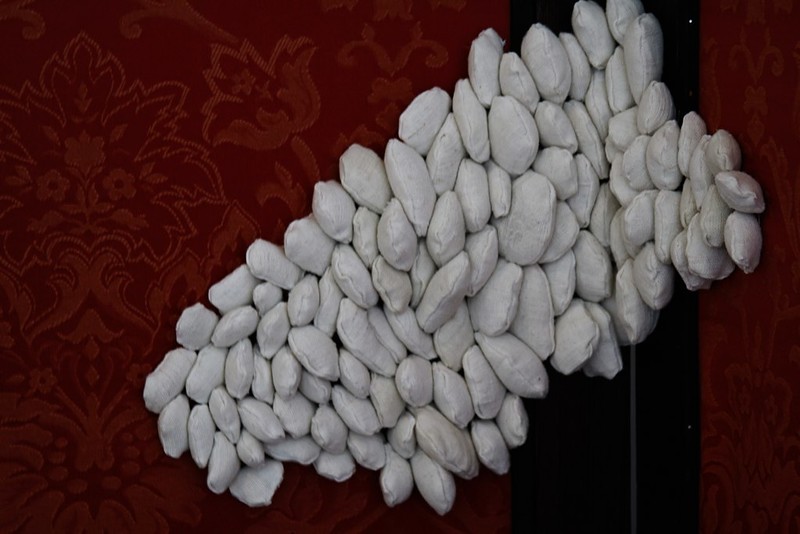
      Laura Guerinoni // Italy // Cell // old hemp fabric, carded wool, thread


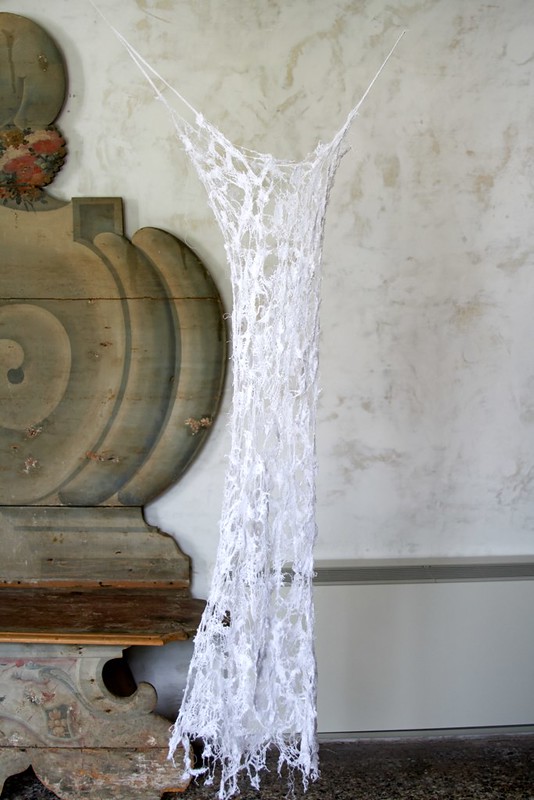
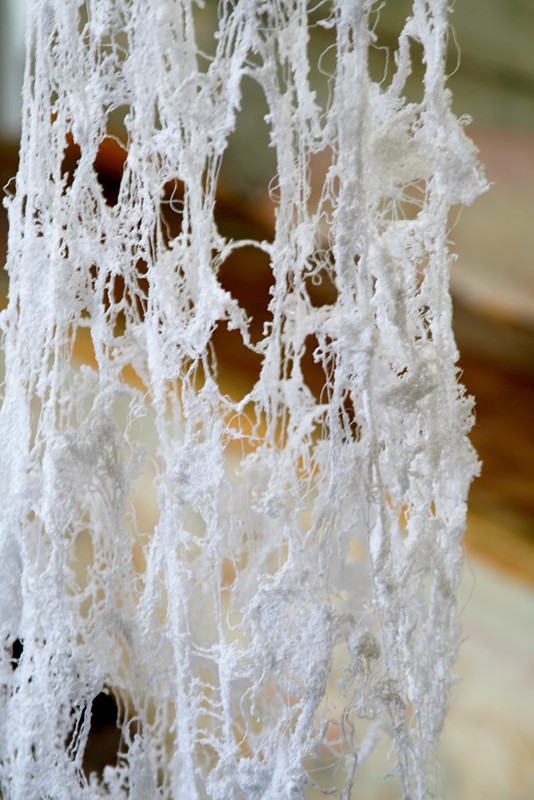
      Nana Hamada // Japan // Seamless Dress // cotton threads


      Sanae Hatano // Japan-Finland // The Fall of Imagination // paper, yarns (wool, metal, polyester, mohair), tape, glue


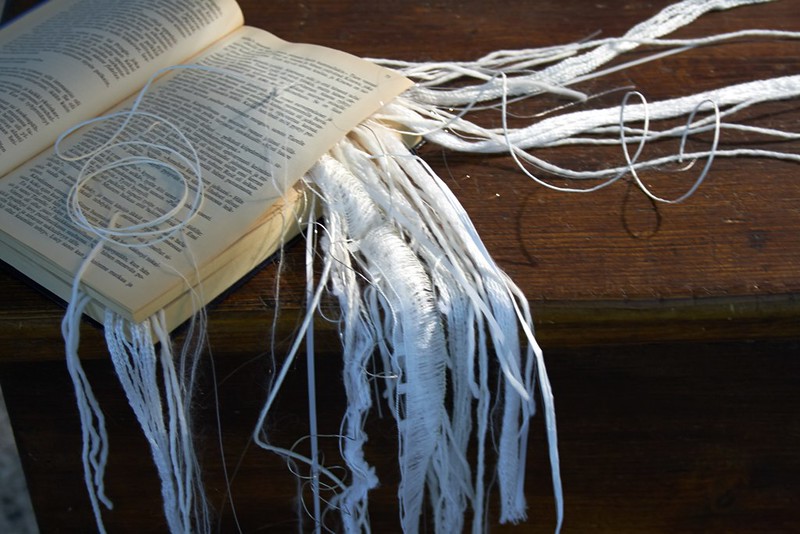
      Alexandra Herta // Romania // Codex // wool threads - jacquard


      Ewa Knapinska // Poland // On the Borderline of Drawing. The Merging // tulle, cotton string, satin sheets - hand stitching


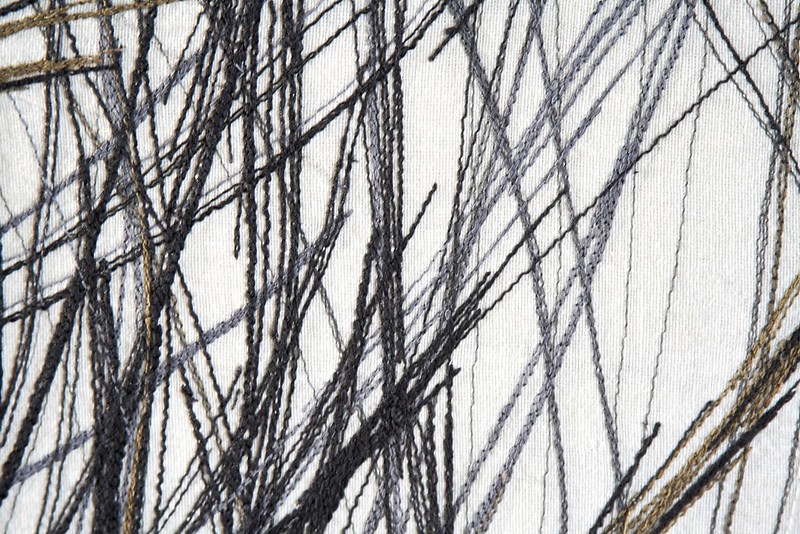
      Justina Monceviciute // Germany-Lithuania // Growing Shadow Series. Greyscale Embroideries // silk organza, cotton yarn, polyester yarn - hand stitching


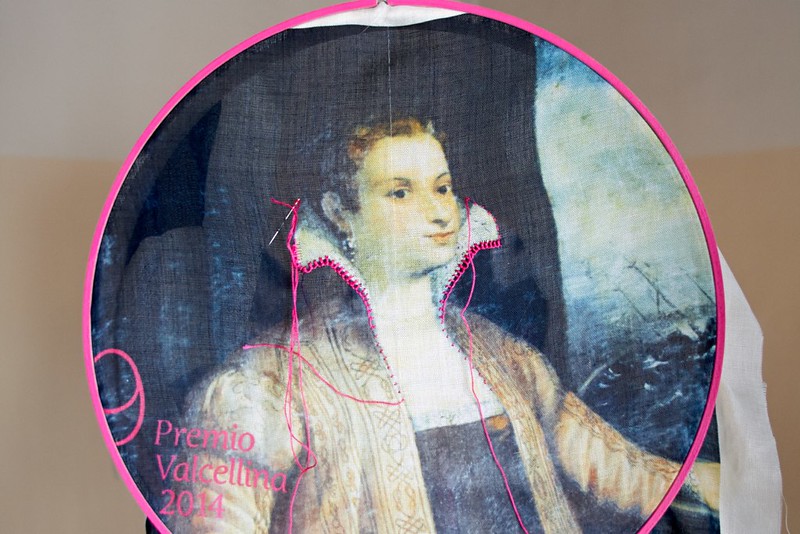
      Eugenia Daniela Pistol // Romania // The Search // linen, sewing thread


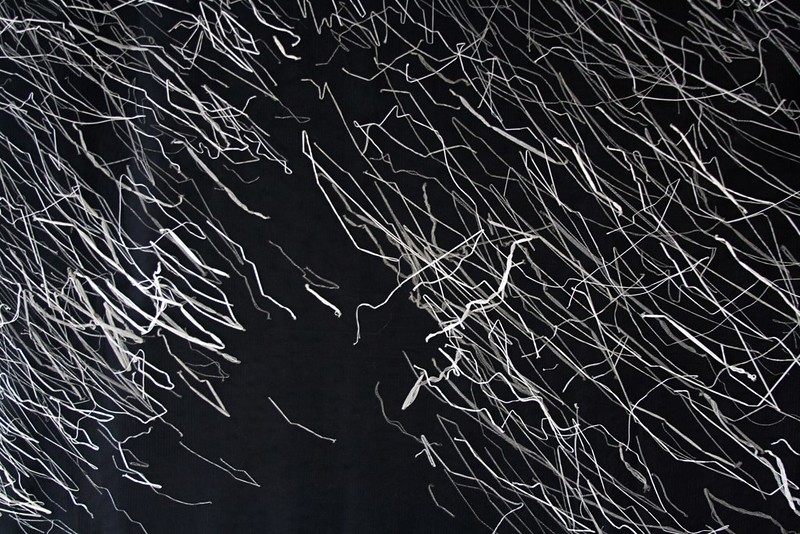
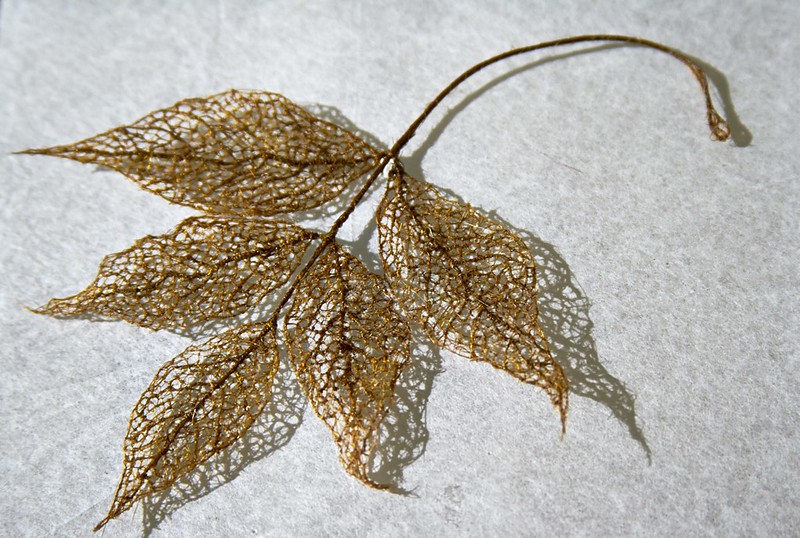
      Jenine Shereos // United States // Leaf // human hair


      I’ll be back in a week with the winners … and remember: supporting talented people is good for the soul :-).


Thank you for visiting. I would love to hear your opinion.

IX Premio Valcellina - prima parte


      Questo è il primo dei due post dedicati alla nona edizione del Premio Valcellina - concorso internazionale d’arte tessile contemporanea. L’evento di arte tessile più importante nella regione ed uno tra i più prestigiosi nell'Italia, il Premio Valcellina ha aperto il 14 aprile a Maniago, Palazzo D’Attimis. Quest’anno il tema era “Il Doppio” e la giuria ha selezionato 24 opere di giovani artisti/artiste.

      Ci sono state tante cose (specialmente per quel che riguarda l’organizzazione) che possono essere criticate o lodate ma io non lo farò. Criticare dal comfort di un piccolo blog non è veramente costruttivo. Tutto sommato penso sia una cosa positiva e una bellissima mostra. Se per caso vi capita di essere nei paraggi nelle prossime due settimane (chiude il 11 maggio) visitatela - merita.

      Queste sono alcune immagini che ho scattato - per la maggiore particolari - delle opere “non premiate”

      Wona Cho // Corea del Sud-Finlandia // Fittizio#1 // tessuto, filo


      Laura Guerinoni // Italia // Cellula // stoffa antica di canapa, lana cardata, filo


      Nana Hamada // Giappone // Vestito Senza Cuciture // fili di cottone


      Sanae Hatano // Giappone-Finlandia // La caduta dell’Immaginazione // carta, fili (lana, metallo, poliestere, mohair), nastro adesivo, colla


      Alexandra Herta // Romania // Codex // fili di lana - jacquard


      Ewa Knapinska // Polonia // Sulla Linea di Confine del Disegno. La Fusione // tulle, spago di cotone, strati di satin - cucitura a mano


      Justina Monceviciute // Germania-Lituania // Serie di Ombre in Ordine Crescente. Ricami nelle Tonalità del Grigio // organza di seta, filo di cotone, filo di poliestere - cucitura a mano


      Eugenia Daniela Pistol // Romania // Ricerca // lino, filo da cucire


      Jenine Shereos // Stati Unitis // Foglia // capelli umani


      Alla prossima settimana con i vincitori … e ricordatevi: sostenere la gente di talento fa bene all’anima :-).


Grazie della visita. Mi piacerebbe moltissimo sentire la vostra opinione.

Apr 17, 2014

Miss Easter Bunny

Miss Easter Bunny


      This week I’ve been forced to bed rest by a nasty flu virus. But because bed rest, between high fever bouts, coughing fits and other really unpleasant stuff, is kinda boring I had to find some little project to make the whole thing bearable. I used some leftover yarn from a baby blanket I made a while back, to crochet this little easter bunny.                                                              


miss_easter_bunny

easter_bunny


      And because I had some “spare” time I wrote down the pattern.
      If you decide to try it and find some mistake please let me know.

Yarn: Delicata Baby from Lane Mondial, 100% Pure New Wool, fingering weight
Hook: 3.5 mm
(* you can modify the overall number of increases/decreases while working with a different combination of yarn weight/hook size)

Abbreviations:
ch = chain
rnd = round 
sc = single crochet
sl st = slip stitch
tr = treble crochet
inc = increase
dec = decrease

      HOWTOs: http://www.garnstudio.com/lang/en/school/lessons_crochet.php

BODY:
Worked in the round in a circle.
Chain 2
————
rnd 1: 6 sc in 2nd ch from hook. Sl st in first sc, to join (place marker for start of round)
rnd 2: inc 1 sc in every sc = 12 sc
rnd 3: * 1 sc in next sc, inc 1 sc in next sc *, repeat from *-* the entire round = 18 sc
rnd 4: * 1 sc in next 2 sc, inc 1 sc in next sc*, repeat from *-* the entire round = 24 sc
rnd 5: * 1 sc in next 3 sc, inc 1 sc in next sc*, repeat from *-* the entire round = 30 sc
… For each new round, add 1 extra sc stitch to the number of sc stitches between increases, each round resulting in 6 more sc stitches compared to the previous round.
rnd 14: * 1 sc in next 13 sc, inc 1 sc in next sc*, repeat from *-* the entire round = 90 sc
————
rnds 15 to 21: work 1 sc in every sc
————
rnd 22: * 1 sc in each of the next 13 sc, dec 1 sc *, repeat from *-* the entire round = 84 sc
rnd 23: work 1 sc in every sc
rnd 24: * 1 sc in each of the next 12 sc, dec 1 sc *, repeat from *-* the entire round = 78 sc
rnds 25 to 27: work 1 sc in every sc
rnds 28, 31, 34, 37, 40, 43, 45 - work decreases the same way as for rnd 24, subtracting with each round 1 sc stitch to the number of sc stitches worked between decreases, each round resulting in 6 less sc stitches, compared to the previous round.
rnds: 29, 30, 32, 33, 35, 36, 41, 42, 44: work 1 sc in every sc
rnd 47: * 1 sc in each of the next 4 sc, dec 1 sc *, repeat from *-* the entire round = 30 sc
————
rnd 48: ch 3 * skip 1 sc, work 1 tr in next sc, ch 1*, repeat from *-* the entire round - this will form a row of eyelets used later to thread ribbon through
————
rnd 49: work 2 sc in every eyelet = 30 sc
rnds 50, 51: work 1 sc in every sc
rnd 52: 1 sc in next 4 sc, inc 1 sc in next sc*, repeat from *-* the entire round = 36 sc
rnd 53: work 1 sc in every sc
rnds 54, 56, 58: work increases the same way as for round 52, adding 1 extra stitch to the number of sc stitches between increases, each round resulting in 6 more sc stitches compared to the previous round.
rnds 55, 57, 59: work 1 sc in every sc
rnd 60: * 1 sc in next 8 sc, inc 1 sc in next sc*, repeat from *-* the entire round = 60 sc
rnds 61 to 63: work 1 sc in every sc
rnd 64: * 1 sc in each of the next 8 sc, dec 1 sc *, repeat from *-* the entire round = 54 sc
rnd 65, 67, 69: work 1 sc in every sc
rnds 66, 68: - work decreases the same way as for rnd 64, subtracting with each round 1 sc stitch to the number of sc stitches worked between decreases, each round resulting in 6 less sc stitches, compared to the previous round.
rnd 70: * 1 sc in each of the next 5 sc, dec 1 sc *, repeat from *-* the entire round = 36 sc
————
      Fill the lower part of the body with some poly stuffing making a small hole in the center with your finger.

crochet_toy

————
rnd 71: * 1 sc in each of the next 4 sc, dec 1 sc *, repeat from *-* the entire round = 30 sc
rnd 72: * 1 sc in each of the next 3 sc, dec 1 sc *, repeat from *-* the entire round = 24 sc
rnd 73: * 1 sc in each of the next 2 sc, dec 1 sc *, repeat from *-* the entire round = 18 sc
rnd 74: * 1 sc in each of the next 1 sc, dec 1 sc *, repeat from *-* the entire round = 12 sc
rnd 75: dec 1 sc in every sc = 6 sc
Sew the last 6 sc tog with thread
————
      Thread some ribbon through the eyelets.

soft_toy

      Push the top side of the body towards the inside to create a pouch.

crochet_bunny

      Tie the ribbon with a bow to close the pouch.

wool_bunny

EARS (make 4 - you can choose to make only two if you use a heavier yarn or want the ears to be floppier)
Worked back and forth on 15 sc stitches for 6 rows. Starting from row 7, on every odd row, decrease 1 sc stitch in the middle of the row until 2 sc stitches remain. Tie off.
————
      Place one ear piece on top of the other and sew along the edges (if you made 4 pieces). Fold at the base and sew to the main body along the top near the ribbon.
      Repeat for the remaining ear pieces.
————
      Embroidery the face. Make a pom-pom tail and sew it to the body.


crochet_bunny_pattern

crochet_bunny_pattern

easter_bunny


      I am now going to eat all the tiny chocolate eggs and she is going to jump in the washer ;-).

      Happy Easter to you all!


Thank you for visiting. I would love to hear your opinion.

Signorina Coniglietta Pasqualina


      Questa settimana sono stata costretta a letto da un’influenza molto antipatica. Uffa!!!! Dato che stare a letto tra colpi di febbre e tosse a altre cose spiacevoli è noioso mi sono dovuta inventare un piccolo progetto che facesse sembrare la cosa meno pesante. Perciò ho usato un po di lana avanzata da una copertina baby che ho lavorato tempo addietro per creare questa piccola coniglietta a uncinetto.                                                              

signorina_coniglietta_pasqualina

coniglietto_pasqua


      E perché ho avuto un po di tempo “libero” ho anche scritto le istruzioni.
      Se decidete di provarlo e trovate degli “orrori” fatemi sapere.

Filato: Delicata Baby da Lane Mondial, 100% Pura Lana Vergine Merino, superfine
Uncinetto: 3.5 mm
(* per usare un filato più pesante in combinazione con un ferro più grande e mantenere le dimensioni, modificare in proporzione il numero di aumenti / diminuzioni.)

Abbreviazioni
cat = catenella semplice 
m.b. = maglia basa 
m. bss. = maglia bassissima
m.a = maglia alta.
aum = aumento
dim = diminuzione

      COME FARE : http://www.conlemani.net/scuola/lezione_1.htm

CORPO:
Lavorato in tondo in spirale.
Cat 2
————
GIRO 1: 6 m.b. in seconda catenella dal ferro. M.bss nella prima m.b., per chiudere il giro. (inserire un segnapunti all’inizio del giro)
GIRO 2: aum 1 m.b. in ogni m.b. = 12 m.b.
GIRO 3: * 1 m.b. nella seguente m.b., aum 1 m.b. nella seguente m.b. *, ripetere da *-* tutto il giro = 18 m.b.
GIRO 4: * 1 m.b. in ognuna delle seguenti 2 m.b., aum 1 m.b. nella seguente m.b.*, ripetere da *-* tutto il giro = 24 m.b.
GIRO 5: * 1 m.b. in ognuna delle seguenti 3 m.b., aum 1 m.b. nella seguente m.b.*, ripetere da *-* tutto il giro = 30 m.b.
… Per ogni nuovo giro, aggiungere 1 extra m.b. al numero di m.b. tra aumenti, ogni giro risultando in 6 m.b. in più rispetto al giro precedente
GIRO 14: * 1 m.b. in ognuna delle seguenti 13 m.b., aum 1 m.b. nella seguente m.b.*, ripetere da *-* tutto il giro = 90 m.b.
————
GIRI 15 a 21: lavorare 1 m.b. in ogni m.b.
————
GIRO 22: * 1 m.b. in ognuna delle seguenti 13 m.b., dim 1 m.b. *, ripetere da *-* tutto il giro = 84 m.b.
GIRO 23: lavorare 1 m.b. in ogni m.b.
GIRO 24: * 1 m.b. in ognuna delle seguenti 12 m.b., dim 1 m.b. *, ripetere da *-* tutto il giro = 78 m.b.
GIRI 25 a 27: lavorare 1 m.b. in ogni m.b.
GIRI 28, 31, 34, 37, 40, 43, 45: lavorare le diminuzioni nello stesso modo del GIRO 24, sottraendo con ogni giro 1 m.b. al numero di m.b. lavorato tra diminuzioni, ogni giro risultando in 6 m.b. meno rispetto al giro precedente
GIRI: 29, 30, 32, 33, 35, 36, 41, 42, 44: lavorare 1 m.b. in ogni m.b.
GIRO 47: * 1 m.b. in ognuna delle seguenti 4 m.b., dim 1 m.b. *, ripetere da *-* tutto il giro = 30 m.b.
————
GIRO 48: cat 3 * saltare 1 m.b., lavorare 1 m.a. nella seguente m.b., cat 1*, ripetere da *-* tutto il giro - viene a formarsi una riga di occhielli che serviranno in seguito per passare del nastro
————
GIRO 49: lavorare 2 m.b. in ogni occhiello = 30 m.b.
GIRI 50, 51: lavorare 1 m.b. in ogni m.b.
GIRO 52: 1 m.b. in ognuna delle seguenti 4 m.b., aum 1 m.b. nella seguente m.b.*, ripetere da *-* tutto il giro = 36 m.b.
GIRO 53: lavorare 1 m.b. in ogni m.b.
GIRI 54, 56, 58: lavorare gli aumenti nello stesso modo del GIRO 52, aggiungendo 1 extra m.b. al numero di m.b. tra aumenti, ogni giro risultando in 6 m.b. in più rispetto al giro precedente GIRI 55, 57, 59: lavorare 1 m.b. in ogni m.b.
GIRO 60: * 1 m.b. in ognuna delle seguenti 8 m.b., aum 1 m.b. nella seguente m.b.*, ripetere da *-* tutto il giro = 60 m.b.
GIRI 61 a 63: lavorare 1 m.b. in ogni m.b.
GIRO 64: * 1 m.b. in ognuna delle seguenti 8 m.b., dim 1 m.b. *, ripetere da *-* tutto il giro = 54 m.b.
GIRO 65, 67, 69: lavorare 1 m.b. in ogni m.b.
GIRI 66, 68: - lavorare le diminuzioni nello stesso modo del GIRO 64, sottraendo con ogni giro 1 m.b. al numero di m.b. lavorato tra diminuzioni, ogni giro risultando in 6 m.b. meno rispetto al giro precedente
GIRO 70: * 1 m.b. in ognuna delle seguenti 5 m.b., dim 1 m.b. *, ripetere da *-* tutto il giro = 36 m.b.
————
      Riempire la parte bassa del corpo con fibra in poliestere facendo un piccolo buco al centro con il dito.

giocattolo_uncinetto

————
GIRO 71: * 1 m.b. in ognuna delle seguenti 4 m.b., dim 1 m.b. *, ripetere da *-* tutto il giro = 30 m.b.
GIRO 72: * 1 m.b. in ognuna delle seguenti 3 m.b., dim 1 m.b. *, ripetere da *-* tutto il giro = 24 m.b.
GIRO 73: * 1 m.b. in ognuna delle seguenti 2 m.b., dim 1 m.b. *, ripetere da *-* tutto il giro = 18 m.b.
GIRO 74: * 1 m.b. in ognuna delle seguenti 1 m.b., dim 1 m.b. *, ripetere da *-* tutto il giro = 12 m.b.
GIRO 75: dim 1 m.b. in ogni m.b. = 6 m.b.
Cucire le ultime 6 m.b. insieme
————
      Passare del nastro attraverso gli occhielli.

coniglio_giocattolo

      Spingere la parte alta del corpo verso l’interno per creare una tasca.

coniglio_uncinetto

      Legare il nastro con un fiocco e chiudere la tasca.

giocattolo_lana

ORECCHIE (fare 4 pezzi - si possono fare anche solo due se si usa una lana più pesante)
Lavorate avanti e indietro su 15 m.b. per 6 giri. Cominciando con il GIRO 7, e per ogni giro dispari, diminuire 1 m.b. nel mezzo del giro finche non rimangono 2 m.b. Tagliare e fissare il filo.
————
      Cucire insieme due pezzi orecchio lungo il contorno, piegare in due alla base e cucirle al corpo lungo la parte superiore vicino al nastro.
      Ripetere per i pezzi rimanenti.
————
      Ricamare la faccia. Fare una coda pom-pom e cucirla al corpo.


modello_coniglio_uncinetto

coniglio_uncinetto_modello

coniglietto_pasqua


      Adesso IO mi mangio gli ovetti di cioccolato e LEI si fa un tuffo nella la lavatrice ;-).

      Buona Pasqua a tutti!!!!


Grazie della visita. Mi piacerebbe moltissimo sentire la vostra opinione.

Apr 9, 2014

Lil Monkey Tunic Top

Lil Monkey Tunic Top


      My little niece, is such a delight to be around. She’s two years old, has crazy hair and a bubbly personality. When I saw this organic cotton jersey at Ottobre Design’s Etsy shop I just had to buy it for her. I skipped a few (hundred) pages from Patternmaking for Fashion Design by Helen Joseph Armstrong to get to the children’s wear chapter and drew this simple tunic with envelope neck and three quarter length sleeves. Actually I drew a dress and had to shorten it to a tunic because when I bought the fabric I did not consider the added length due to the envelope neckline and I ordered just half a meter.


      It was very easy and fun to sew.


tunic_top

girl_tunic


      When I took it to her she declared “mine!” and insisted on wearing it right away. Of course I was a very very happy auntie. So we went out and took some photos.


girl_tunic

girl_top

ottobre_fabric


      I’m not so happy with the neckline, it’s too big … so I decided to redraw it and resew the whole thing (this time as a dress ;-) and I will post the pattern for download.


Thank you for visiting. I would love to hear your opinion.

Vestitino Piccola Scimmietta


      E’ un piacere stare insieme alla mia piccola nipotina. Ha due anni, capelli matti e una personalità frizzante. Quando ho visto questo jersey in cottone organico nel negozio Etsy di Ottobre Design, ho DOVUTO prenderglielo. Ho saltato un po di pagine (centinaia) del libro che uso per imparare a modellare ( Patternmaking for Fashion Design di Helen Joseph Armstrong) per arrivare al capitolo che parla degli abiti per bambini e ho disegnato questo vestitino con collo “che non so come si chiama in italiano ma in inglese si chiama envelope (busta); ? “ e maniche trequarti. La verità è che doveva essere un vestitino ma quando ho comprato il tessuto non ho pensato alla lunghezza aggiunta dalla costruzione dello scollo e ho ordinato solo mezzo metro - che evidentemente non è bastato.
      E’ stato molto facile e divertente da cucire una cosa così piccina.


vestitino_corto

vestitino_bambina


      Quando glielo portato ha dichiarato “per me!” e insistito a metterlo su subito. Ovviamente la cosa mi ha resa una zietta molto, ma molto, felice e siamo uscite a fare delle foto.


girl_tunic

girl_top

ottobre_fabric


      Trovo che il collo sia un po' troppo “largo” perciò ho deciso di ridisegnarlo e rifare l’intero vestitino (stavolta a misura vestitino) … e poi condividerò con voi il cartamodello.


Grazie della visita. Mi piacerebbe moltissimo sentire la vostra opinione.

Google+