Winter Laurel Dress

Ciao!
Between my toddler years and college I’ve never wore (or owned for that matter) a skirt, dress or whatever other piece of feminine clothing you might think of. My father used to joke referring to me and my brother as “my boys”.
In college I started wearing some skirts but never a dress. I could never find a dress I liked, that fitted me. There is a two whole sizes difference between my upper body and my lower body due mainly to skeletal structure and therefore a dress would either be way to tight around my hips or sag on my torso. Spending a lot of money to buy a dress and then spending some more to alter it, just didn’t seem right to me. Still, I wanted a dress …I like dresses; In consequence, my newly born love story with the sewing machine inspired me to try and make one for myself!
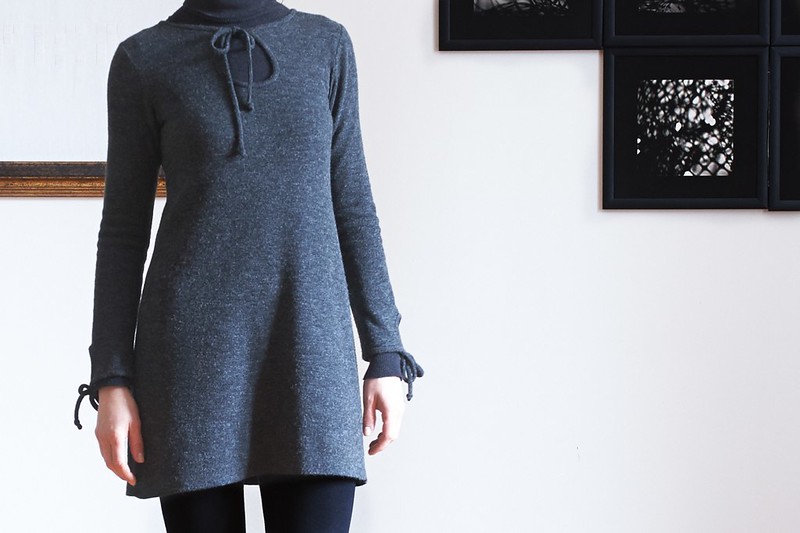
When I saw the pattern for the Laurel Dress from Colette Patterns I thought “this is it”. It seemed simple enough for a beginner like me … had a beautiful line and the companion book suggested a lot of wonderful variations. The problem was it was winter and the dress seemed more appropriate for the spring/summer. Transforming it in a winter dress required a little bit of work … the fact that I wanted to use for it a medium weight wool jersey, required some more.
I cut a size 0 for the skirt and I graded down the bodice to a size -4 (to compensate for the stretchiness of the fabric). I lengthened the bodice at the waist by 1(1/4) inches and modified the sleeves to full length. I used variation 5 in the companion book, the keyhole neck, and made matching smaller (scaled down the pattern using a copier) keyholes to the sleeves. Instead of cutting the bias binding on the bias I had to cut it perpendicular to the grainline because for the jersey that is the stretchiest.
And that’s it … my first dress ever.


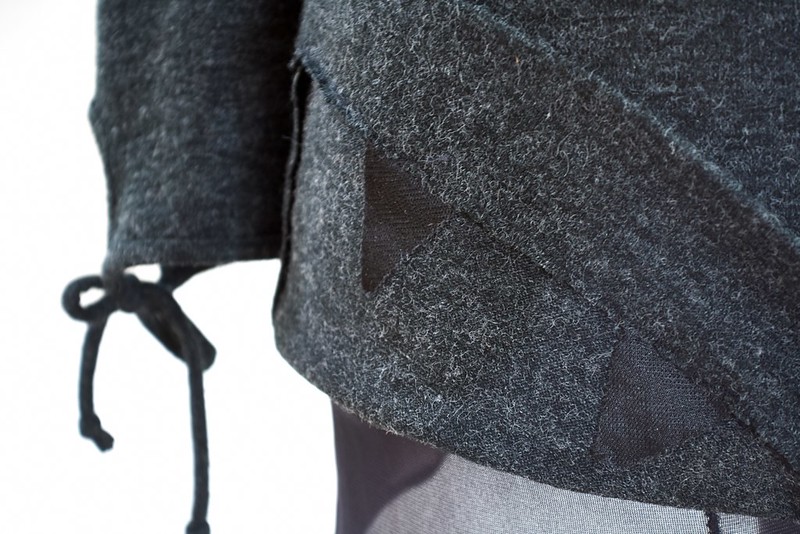
I had a little bit of problems with the hem … it resulted bulky and very visible (the wool strands in the fabric pulled when I tried to sew the hemline) so I used small fusible interface triangles (I figured the spaced triangles won’t interfere with the drape and would not add stiffness) and sewed the hem to them. I had to try different interfacing types as I needed a good one that would hold. Maybe there is some other way but as I have no idea what I’m doing what so ever and so I’m winging it this is the only way I could come up with.
I lined the main body of the dress with a very fine stretch lining material.
 I like the result. It is very comfortable and I’m wearing it a lot :)
And BTW for sewing it I used a walking foot.
Between my toddler years and college I’ve never wore (or owned for that matter) a skirt, dress or whatever other piece of feminine clothing you might think of. My father used to joke referring to me and my brother as “my boys”.
In college I started wearing some skirts but never a dress. I could never find a dress I liked, that fitted me. There is a two whole sizes difference between my upper body and my lower body due mainly to skeletal structure and therefore a dress would either be way to tight around my hips or sag on my torso. Spending a lot of money to buy a dress and then spending some more to alter it, just didn’t seem right to me. Still, I wanted a dress …I like dresses; In consequence, my newly born love story with the sewing machine inspired me to try and make one for myself!
When I saw the pattern for the Laurel Dress from Colette Patterns I thought “this is it”. It seemed simple enough for a beginner like me … had a beautiful line and the companion book suggested a lot of wonderful variations. The problem was it was winter and the dress seemed more appropriate for the spring/summer. Transforming it in a winter dress required a little bit of work … the fact that I wanted to use for it a medium weight wool jersey, required some more.
I cut a size 0 for the skirt and I graded down the bodice to a size -4 (to compensate for the stretchiness of the fabric). I lengthened the bodice at the waist by 1(1/4) inches and modified the sleeves to full length. I used variation 5 in the companion book, the keyhole neck, and made matching smaller (scaled down the pattern using a copier) keyholes to the sleeves. Instead of cutting the bias binding on the bias I had to cut it perpendicular to the grainline because for the jersey that is the stretchiest.
And that’s it … my first dress ever.
I lined the main body of the dress with a very fine stretch lining material.
And BTW for sewing it I used a walking foot.
Vestitino Laurel Invernale
Ciao!
Da quando ero molto piccola fino all’università non ho mai indossato gonne, vestitini o qualche altro capo di abbigliamento femminile. Scherzando, mio papà chiamava me e mio fratello “i miei ragazzi”.
Ai tempi dell’università ho cominciato ad indossare qualche gonna ma mai un vestito. Non sono mai riuscita a trovarne uno che mi piacesse e che mi stesse bene senza nessuna modifica; visto che c’e una differenza di due misure intere tra le parti superiore ed inferiore del mio corpo (struttura ossea - che ci vuoi fare?) Spendere per comprare un vestito e poi dover spendere ancora per le modifiche e sopratutto dover aspettare di indossarlo non mi è mai sembrato molto divertente. Nonostante ciò mi piacciono i vestiti e ne ho sempre voluto uno. E qui la mia nuova storia d’amore con la macchina da cucire mi e tornata utile visto che ho deciso di farne uno.
Quando ho visto il cartamodello per il Vestito Laurel di Colette Patterns ho pensato “eccolo qua!”. Sembrava abbastanza semplice per una principiante come me e le istruzioni passo per passo (in inglese purtroppo) sono molto chiare. Inoltre ho trovato il vestito molto bello e le variazioni nel libro che accompagna il cartamodello sono molto carine. Ma eravamo in inverno e Laurel è più un vestito da primavera / estate. Trasformalo in un vestito invernale richiedeva un po’ di lavoro, cucirlo in un jersey stretch di lana di medio peso, ne richiedeva un altro po’.
Ho tagliato per la parte della gonna una misura 0 (del cartamodello) ed ho scalato la parte del corpetto fino ad una misura -4 (per compensare l’elasticità del tessuto). Ho allungato il corpetto di 3 cm in vita e modificato le maniche corte in lunghe. Ho usato la variazione numero 5 del libro per la decorazione al collo e per le maniche (riducendo il modello con la copiatrice). Invece di tagliare sullo sbieco il nastro per rifinire collo e maniche l’ho dovuto tagliare di traverso perché è la direzione più elastica del jersey.
Questo è il risultato … il mio primissimo vestito.
Ho riscontrato un po di problemi nel fare l’orlo… risultava troppo voluminoso e molto visibile (i fili di lana della maglia si tiravano quando provavo a cucire l’orlo invisibile) perciò visto che non ho la minima idea di quello che sto facendo e me la sto inventando alla grande ho pensato di cucire l’orlo invece che direttamente ai fili del jersey ai fili di alcuni triangoli di fliselina adesiva a maglia che ho incollato sul retro del vestito in corrispondenza dell'orlo. Ho pensato che per la loro forma i triangoli non dovrebbero ne interferire con il drappeggio ne aggiungere rigidità. Ho dovuto provare parecchi tipi finché non ho trovato una fliselina di buona qualità che tenesse. Magari qualcuna di voi conosce un qualche altro metodo?
Finalmente ho foderato il corpo principale del vestito con una fodera stretch molto fine.
Sono contenta di come mi è venuto. E un vestito molto confortevole e lo sto portando parecchio. :)
E a proposito per cucirlo ho usato un piedino doppio trasporto.
Da quando ero molto piccola fino all’università non ho mai indossato gonne, vestitini o qualche altro capo di abbigliamento femminile. Scherzando, mio papà chiamava me e mio fratello “i miei ragazzi”.
Ai tempi dell’università ho cominciato ad indossare qualche gonna ma mai un vestito. Non sono mai riuscita a trovarne uno che mi piacesse e che mi stesse bene senza nessuna modifica; visto che c’e una differenza di due misure intere tra le parti superiore ed inferiore del mio corpo (struttura ossea - che ci vuoi fare?) Spendere per comprare un vestito e poi dover spendere ancora per le modifiche e sopratutto dover aspettare di indossarlo non mi è mai sembrato molto divertente. Nonostante ciò mi piacciono i vestiti e ne ho sempre voluto uno. E qui la mia nuova storia d’amore con la macchina da cucire mi e tornata utile visto che ho deciso di farne uno.
Quando ho visto il cartamodello per il Vestito Laurel di Colette Patterns ho pensato “eccolo qua!”. Sembrava abbastanza semplice per una principiante come me e le istruzioni passo per passo (in inglese purtroppo) sono molto chiare. Inoltre ho trovato il vestito molto bello e le variazioni nel libro che accompagna il cartamodello sono molto carine. Ma eravamo in inverno e Laurel è più un vestito da primavera / estate. Trasformalo in un vestito invernale richiedeva un po’ di lavoro, cucirlo in un jersey stretch di lana di medio peso, ne richiedeva un altro po’.
Ho tagliato per la parte della gonna una misura 0 (del cartamodello) ed ho scalato la parte del corpetto fino ad una misura -4 (per compensare l’elasticità del tessuto). Ho allungato il corpetto di 3 cm in vita e modificato le maniche corte in lunghe. Ho usato la variazione numero 5 del libro per la decorazione al collo e per le maniche (riducendo il modello con la copiatrice). Invece di tagliare sullo sbieco il nastro per rifinire collo e maniche l’ho dovuto tagliare di traverso perché è la direzione più elastica del jersey.
Questo è il risultato … il mio primissimo vestito.
Finalmente ho foderato il corpo principale del vestito con una fodera stretch molto fine.
E a proposito per cucirlo ho usato un piedino doppio trasporto.